Self-Tanning Routine and Favorite Products

As I type this post, I see that my lovely little corner of the world is expecting 4-7 inches of snow this weekend. Combine that with the fact that the sun now goes down at 4:30pm and I’m in dire need of a dose of summer.  Enter one of my most treasured beauty rituals: Self-Tanning.

A golden tan can give you a healthy glow and, let’s be real, the whole “If you can’t tone it, tan it!” sentiment is very true.  A good tan helps you look and feel better. Thankfully, self-tanning products have come a LONG way in the past few years, and when these products are combined with a solid pre and post application routine, you can be tan and glowing every day of the year – all without being exposed to damaging UV rays.

Here is my self-tanning routine and favorite products for face and body:

arm

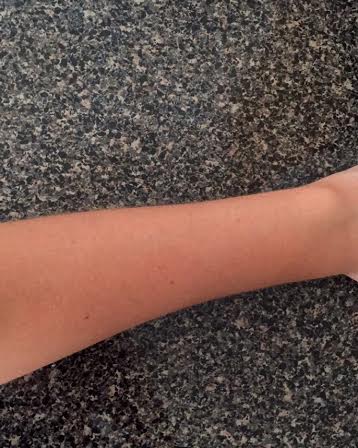
Here’s my tan, disembodied arm

Pre-Tan Application

I typically do my self-tanning routine at night so when I wake up in the morning my tan has darkened and I’m good to go.

The number one key to a streak-free, long-lasting, even tan is to exfoliate pre-application.  You can shell out money for fancy body scrubs that smell like angel kisses and will take off your top layer of skin, or you can do what I do and buy cheap exfoliating shower gloves at the drugstore:

ex gloves

Hop in the shower, squeeze some body wash on these bad boys and scrub your whole body down – especially focus on knees, elbows and ankles as self-tanning products tend to really stick to those areas and can make them develop darker than the rest of your tan.

3

Don’t forget to also exfoliate your face!  My favorite product that I’ve talked about before are the Skin Obsession Microdermabrasion Crystals mixed with whatever cleanser I have in the shower.

Tan Application

Now that you’ve exfoliated the top layer of your skin off (gross but yay!) and you’re out of the shower, it’s time to dry off completely and apply the tan.  I know that your skin is all dry and itchy feeling and you want to dip your entire body in lotion but WAIT, we’ll get there.

If you’re using a mouse or a spray, grab some old/dark-colored towels to lay down on the floor to prevent any stains.  And if you live alone like me or have the house to yourself for an hour, I highly suggest applying your tan in another, cooler temperature room – your bathroom is a humid, hot place after you’ve showered and that environment can double the time it takes your tan to dry.  So if you have the option, spread out some towels in the living room and let’s get down to business:

jergens

I’ve tried quite a few self-tanning products, from very expensive to drugstore, and I can’t recommend this Jergen’s mousse enough.  It’s inexpensive ($10), has a pleasant smell, and gives me natural-looking color that lasts a good 3-5 days.

  • Use gloves and/or a mitt to keep your hands from getting horrifically stained. Apply a few pumps to your mitt, smooth it all over one body part at a time and keep working.  I start at my feet and work upwards but it’s your world, start wherever you want.

gloves and mitt

  • Once you’ve applied the tan all over your body, you may want to use a product specifically made for self-tanning the face. I’ve found in the past that the body tanners do give me great color on my face but they break me out horribly, and tan pimples suck just as much as pale ones.

    Instead, I mix a bit of Olay daily moisturizer with a small amount of Tarte’s Maracuja Face and Body Self Tanner and apply all over my face.  Done.

tarte

Post-Tan Application

The hard part is over!  Now just chill out for a few minutes (Naked! Scandalous!) to let your tan dry.  Once you feel sufficiently dry (10-20 minutes), it’s time to add moisture back into the skin.  I cover myself top to bottom in my favorite lotion of all time – Vaseline Cocoa Radiant.

vaseline

Applying lotion every day will help keep your skin soft and extend the longevity of your tan.  If you want to give your tan an extra boost when it starts to fade several days later, I highly recommend the St. Tropez One Night Only Instant Body Glow Lotion

st tropez

This lotion is pricey but it’s great for giving your tan some extra color, or you if you don’t feel like going through the whole self-tan process described above, apply this for a tan that washes off in your next shower.

And that’s it! Happy Bronzing!

10 Songs to Get You Through Every Breakup Stage

Death, taxes, breakups.  They’re all inevitable.  It’s a human rite of passage to have your heart blown to pieces by another person – usually a person who, once upon a time, you thought was the absolute greatest thing in the entire universe.  But now it’s over, and it sucks.  Shit happens.

It doesn’t matter if you did the dumping or you were dumped – the general feeling of terribleness may follow you around for quite awhile.  Thankfully, music can assist with the healing process and help you work through those emotions, let out any anger and eventually move the hell on. I’ve put together a playlist to let you cry it out at the beginning and ultimately rise from the ashes like the majestic phoenix of perfection that you are.

There are many stages to post-breakup ~*fEeLiNgS*~ so let’s start at the beginning:
Stage One: Freshly Dumped – No One Cheated

Stage One sans infidelity is characterized by lots and lots of sadness.  Everything reminds you of your former boo.  You’re probably going through infinite amounts of ice cream, wine and Kleenex so turn on this song (or watch the video if you want to cry along with Sinead) and let it all out:

Nothing Compares 2 U – Sinead O’Connor


Stage One – Part One: Freshly Dumped – That Asshole Cheated

Stage One with infidelity thrown in is a whole other animal. How? What? Why? But? Her? Him?  You may still be in shock and trying to process what the hell just happened.  Enter Mary J. Blige:

Not Gon Cry – Mary J. Blige

Mary is here to remind you not to cry – don’t give that jerk the satisfaction of your tears. You’re fabulous.  Keep it movin’.
Stage One – Part Two: That Asshole Cheated – Anger Edition

You’ve had some time to think about this whole mess and wow, are you mad.  You’re seeing red.  “Pissed” doesn’t quite do your feelings justice.  You want to bust the windows out of his damn car.
Now I don’t suggest going out and actually committing said crime (although it would feel soooo good). Instead, crank up these jams:

Bust Your Windows – Jazmine Sullivan


It’s Not Right, But It’s Okay – Whitney Houston


Stage Two – Wallowing and Acceptance

Well, everything still sucks, but not as much.  You’ve come to terms with the fact that the relationship is over and you’re feeling a bit blah and numb.  This is the laid-back wallow stage where you process what went wrong and hopefully learn from the relationship.  Stage Two music is softer, quieter, more introspective.  This stage might also last you a good bit of time so I’ll give you two songs to help you through:

Almost Doesn’t Count – Brandy

Head back to the late 90s with Brandy, or head back even later to 1965 and let Johnny Cash express your feels:

Don’t Think Twice, It’s Alright – Johnny Cash

Stage Three – Back and Better Than Ever

You’ve had time to be sad, angry and numb.  And you know what?  You’re good now.  No, you’re great. Awesome.  You’re ready to get back on the proverbial horse and show yourself off to the world.

But first – some music to get your mind right and prepare you for re-entrance to the dating scene.
My suggestions:

Migrate – Mariah Carey


Freakum Dress – Beyonce


How To Be A Heartbreaker – Marina and the Diamonds


Miss Movin’ On – Fifth Harmony


You did it!  You survived the breakup.  Now get back out there so you can do it all over again.

Review: Maybelline Color Tattoo Eyeshadows

There’s one makeup product I hoard more than the rest.  And by hoard, I mean that I have at least 10 of these awesome little pots of color in my makeup bag at any given time.  Excessive? Probably. Do I care? You know I don’t.

The reason I have so many Maybelline Color Tattoo eyeshadows is because they are flat-out amazing.  They’re inexpensive ($5), come in a huge range of colors, and they’re the perfect base for any eye look.  Color Tattoos provide pigment and a nice, sticky base for powder shadows to cling to and stay in place for hours and hours.

My absolute favorite shade, and the one I reach for almost every day, is Bad to the Bronze:

Bad to the Bronze
Photo Credit: ulta.com

This warm bronze is a great base for daytime and nighttime looks.  Use your finger for more sheer coverage; use a wet brush to pack on the color and shine. Bad to the Bronze pairs beautifully with any eye color so if you don’t have it yet, get yourself to CVS ASAP.

maybelline-color-tattoo-25-bad-to-the-bronze

Photo Credit: ivoryavenue.com

For those of you #blessed with hooded eyes like me, Color Tattoos are a must to keep powder shadows from getting lost in the abyss that is our crease.  This is especially true for brightly colored looks.  I’m a huge fan of the Painted Purple Color Tattoo because it makes my blue eyes look mega, crazy blue:

painted purple
Photo Credit: Maybelline.com.au

Here’s Painted Purple with powder shadow on top, in case you’d also like to channel your inner 90s neon workout Barbie:

Halloween

Other shades I’d highly recommend:

  • Barely Branded: Creamy, champagne color for neutral looks

BB
Photo Credit: Maybelline.com

  • Pomegranate Punk: Deep, burgundy color that pairs very well with the shadows in the Naked 3 palette

81ePvClhRtL._SX522_
Photo Credit: amazon.com

  • Audacious Asphalt: Charcoal grey a.k.a. the only smoky eye base you’ll ever need

8125Y315CaL._SX522_
Photo credit: amazon.com

Color Tattoos are inexpensive, available at every drugstore and online and one pot will last FOREVER.  Literal years.  They do dry out a bit as they age but I find that using my warm finger (that sounds gross but you know what I mean) to apply the shadow “melts” the formula and gives me smooth, even coverage.

I highly recommend you pick up one or 15 Color Tattoos on your next drugstore run.  Enjoy!