Eyelash Extensions: Experience & Review

There are milestones in life: birth, death, graduations, relationships beginning and ending.  Sure, those things are important, but allow me to add another milestone to that list – the day the wonder of eyelash extensions enters your world.

As I’ve talked about before, I’m a huge fan of lashes.  Real or fake  – doesn’t matter, give me ALL of them.  I’ve spent countless hours and dollars in the pursuit of the long, lush lashes that will open up my hooded eyes and help me channel my inner Beyonce.

I believe that at long last I’ve finally found the solution: Eyelash extensions. Let the church say AMEN.

snap.jpg

Warning: Extensions cause excessive selfie taking

After doing extensive research (i.e. did my Googles) and telling myself that yes, I can fit this into my budget even if I have to live on grilled cheese for 2 weeks, I decided to plunk down some cash on eyelash extensions.  Soon after I found myself lying on a comfy bed in a suburban Chicago salon for 90 minutes while a very nice lady glued an extension on to each of my individual lashes.  Yes, it takes a long time.  Yes, it’s worth it.

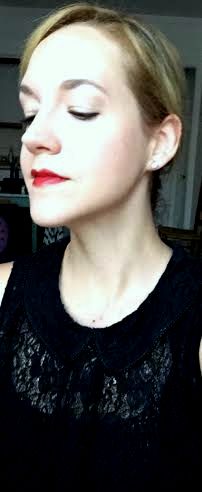
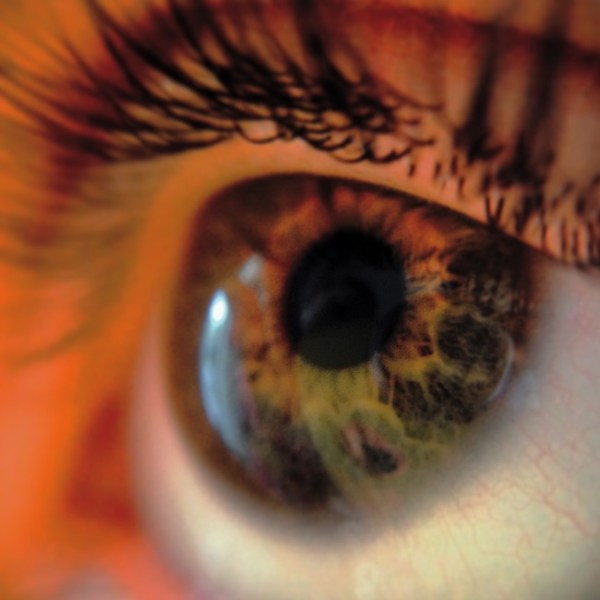
First I’ll show you how my God-given lashes look without any makeup.  Prepare yourself for blurry iPhone photos:

closed originalme.jpg

As you can see, my lovely hooded lids tend to swallow up my lashes and make them pretty much non existent when my eyes are open.  My natural lash hairs are also very fine.  According to the extension applier, I have a lot of lashes, they just aren’t thick or particularly long.  But hey – I have a sparkling personality.  God’s working on all of us.

The process itself is pretty simple – lay down, have your lower lashes taped down (it feels weird but is necessary) and take a little snooze or meditate while the extensions are applied.  It’s actually quite relaxing.

XtremeLashesApplication.jpg

Photo Credit: edenenvy.com

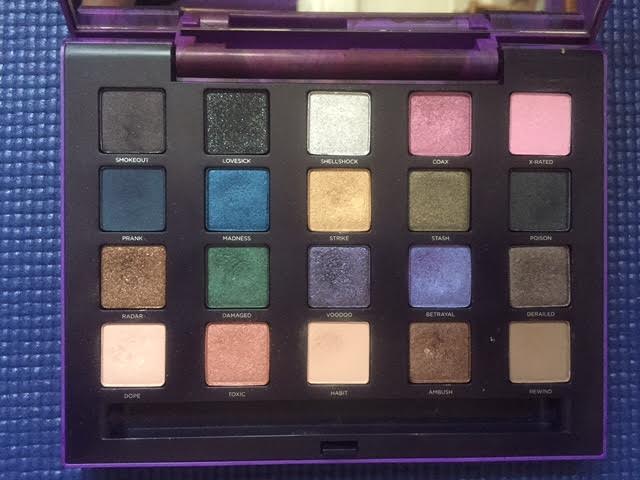
Typically the salon will have a variety of extension styles.  My salon gave me the option of a more natural look or a more dramatic cat eye and I figured if I’m gonna do this, I’m gonna DO IT so of course I went with the cat eye style.  I’m very happy with how they turned out.

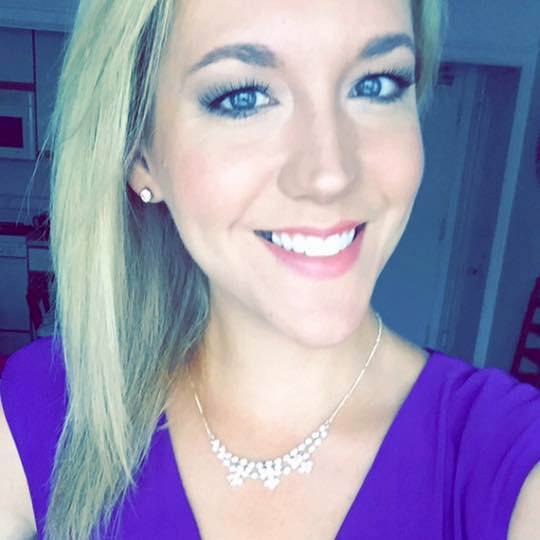
Here’s how they look open, closed and from the side without any other makeup:

close up

closed new

profile

As you can see, one of the biggest advantages of extensions is you don’t have to wear mascara or curl your lashes anymore! It’s taken a couple days to get used to waking up and seeing myself with “done” lashes but it saves time in the morning and makes me look so much more awake and put together even when the rest of my face is completely bare.  An unexpected but very welcomed side effect is that the lashes seem to make the always-present bags under my eyes much less noticeable.  Woo!

The only slight downside is that you cannot get your lashes wet for the first 24 hours and it’s recommended to be very careful to not rub your eyes or pull on your lashes in any way. So, I’ve said goodbye to splashing my face with water in the morning and standing with my face in the water while in the shower, but there are bigger tragedies in life.  I’ve seen the suggestion to wear swimming googles while in the shower, not a bad idea.  Makeup wipes are also a gift from the heavens. The only real day-to-day maintenance is to brush them out every morning with a spoolie as the lashes can get a little tangled and wonky during the night.

The lash extensions are glued directly onto the natural lash and will fall out with their natural cycle.  The salon suggests coming in for fill-ins every 3-4 weeks to keep everything looking great.  I’ve already scheduled my fill-in appointment so I think it’s safe to say that I LOVE lash extensions and highly recommend them.

full face

Do you have lash extensions?  Do you love them, too?  Let me know!

Mascara Tips & Tricks

My oldest and truest love in the makeup world is mascara. It’s my “desert island” product. I have a minimum of 5 tubes in my makeup stash at any given time (stay tuned for my episode of Hoarders). I can’t live without it. Okay I could…but I don’t want to.  Why?  Because mascara makes a huge difference, especially for hooded eye folks like me, and there’s just something ultra feminine and Marilyn Monroe-esque about having long, fluttery lashes.  

Over my many years of mascara wearing and beauty researching, I’ve learned some helpful tips and tricks to get the most out of my lashes and I’m happy to share those tricks with you.  Here we go:

me
Right eye brought to you by the power of mascara; facial expression brought to you by seasonal allergies.

Heat It Up

It goes without saying that a good lash curler plays an integral part in making your lashes look their best. So before you start applying any makeup, throw your lash curler and/or mascara tube in your bra. Yes, you read that correctly.  

Heating up the curler helps lashes hold the curl longer while heating up the mascara softly melts the formula and leads to easier, smoother, less clumpy application.  Some beauty gurus advise heating up the curler with a hairdryer but I’m far too lazy for that and prefer to just stick my curler in my bra for a few minutes and let body heat do its thing.  Works just as well and really confuses anyone who happens to be watching you apply your face.

curler

Looks weird, works well

Line the Waterline

The majority of us aren’t #blessed with thick lashes but luckily it’s easy to fake them by lining the upper waterline.  This trick isn’t for the faint of heart because you’ll be putting a pointy object dangerously close to your eyeball but it really does make a world of difference:

tightline

Photo Credit: beautylish.com

Run a waterproof black or dark brown liner on that tiny strip of skin to fill in the gaps between lashes and give you a more cohesive, full lash look.

Use a Lash Primer

Not necessarily a must-have for every day, but when you really want to make lashes look extra long, thick and fabulous, apply a lash primer before mascara.  My favorite is the Benefit They’re Real Tinted Lash Primer:

benefit

Lash primer is also great for “no makeup” makeup looks, giving just enough color and length to make eyes look more open and awake without looking made up.

Swipe Time

Mascara application is where the real magic happens.  Most important application tips:

  1. Swipe Toward the Nose – Instead of just swiping the wand straight up, angle toward your nose to fan out the lashes and cut down on mascara transferring onto the eyelids.  No one likes dealing with that mess.

  2. Base and Blink – Set the wand as far down on your lashes as you can get, right at the base, wiggle it a bit to get mascara on the roots of your lashes, then slowly blink as you move the wand upward and toward your nose in one fluid stroke.

  3. Coat Both Sides – Don’t forget the top side of your lashes!  Once you’ve done the base and blink technique, look down and coat the top of the lashes all the way up to the tips.

Revive Old Mascara with Eye Drops

There always comes that inevitable time when a tube of well-loved mascara turns dry, clumpy and basically unusable.  This is a good excuse to run out and buy another one but if you want to revive the mascara and stretch your money, add a couple squeezes of eye drops to the tube and swirl everything around with the wand.  Voila! Mascara resurrection.

drops

And there you have it, my best mascara tricks.  What is your lash secret weapon?  Let me know!

Super Bowl 50 Makeup

FullSizeRender

Three things I dearly love:

  1. Makeup
  2. Sports
  3. A theme

In honor of Super Bowl 50, I’ve combined all three loves in 2 different eye looks using the Denver Broncos and Carolina Panthers team colors.  Yes, I do have too much time on my hands.

But really, who wants to live in a world where people eat copious amounts of junk food, drink beer and watch grown men knock each other down without matching their eye makeup to the team they’re cheering for? Certainly not me.

Whether you’re Team Cam or Team Peyton (or Team Brady like me and extremely bitter), we can all agree that makeup is the real MVP. In case you’ve also always wanted to match your makeup to a jersey, here are two Super Bowl 50 inspired eye looks:

IMG_1173

I really need to buy an actual camera and learn to pose but you get the idea

Look 1: Denver Broncos
Denver_Broncos_Logo
– Lid: Roulette (Makeup Geek)

– Outer corner: Lucius (Kat Von D Shade & Light palette)

– Crease: Laetus (Kat Von D Shade & Light palette)

– Liner: Navy (Tarte gel liner)IMG_1165Look 2: Carolina Panthers

CarolinaPanthers2012

IMG_1169

All shadows from the Urban Decay Vice 2 palette

vice 2
– Lid: Madness

– Inner corner: Shellshock

– Outer corner: Prank

– Crease: Dope + Habit

– Liner: Eyeko Fat Liquid Liner in Black

FullSizeRender

Brows: Anastasia Beverly Hills Brow Definer – Soft Brown
Lashes: Urban Decay Perversion Mascara – Black


Hope you enjoy trying out these looks and let’s all root for the one thing we can all agree on – good commercials.

All About Brushes

You know the famous line from Mommie Dearest, “No Wire Hangers EVARRRRRR!”?  Well, that’s exactly how I feel about those terrible little sponge applicators and brushes that come with drugstore makeup.  Those “tools” are great for basically anything other than adequately applying and blending makeup.

So what is great for eyeshadow, and really all makeup, application? Brushes.  Yes, you’ll have to spend a little extra money for them, but good quality brushes will last a long time and up your makeup game by a million.

Here are my favorites:

Foundation

There are many different ways to apply foundation – fingers, sponges, brushes, etc.  My go-to move is to apply primer first with my fingers (I believe the heat of my fingers helps settle the primer into my skin better) and then apply my powder foundation with a Sigma flat top kabuki brush.

kabuki
Photo credit: sigmabeauty.com

The flat top on this brush really works the product into the skin and distributes powder evenly.  It’s also great for applying BB creams and liquid foundation.  Make sure to clean this brush regularly to keep bacteria at bay and your skin clear.

Eyes
If you only want to buy one eyeshadow brush, buy the Mac 217.  It’s the Holy Grail.  The bristles are just stiff and compact enough to let you apply AND blend shadow with the same brush.  I typically use this one most in my crease and outer corner.

217
Photo credit: prityskincare.com

The key to any good eye look is blending, blending, blending.  The best part about buying good brushes is that they practically do all of the blending work for you.  Especially the Sigma E40:

e40

The E40 is a fat, fluffy brush that I swear has magical blending powers.  The soft bristles sweep and blend shadow together without drastically moving/wiping away any of the product.  If that makes any sense.  Long story short – it’s awesome, get one.

Real Techniques
Real Techniques deserves its own category because the brushes are just that good, and they’re inexpensive!  RT kits and individual brushes are sold at most drugstores and online.

I highly recommend the starter set:

RT
Photo credit: boots.com

The blush brush:

blush

Photo credit: vampyvarnish.com

And the expert face brush:

fdn

Photo credit: ulta.com

And no one likes to do it, but cleaning your brushes is key.  I try to clean mine a minimum of once a month with a solution of warm water, vinegar and dish soap.  Once they’re all clean, lay brushes out flat on a towel to dry overnight and feel smug with pride when you use your clean, fresh brushes the next morning.

What brushes should I add to my collection?  Let me know!

Top 5 Eyeshadow Palettes

When it comes to makeup in general, I try to use a mix of mostly drugstore products with a few high end products. When it comes to eyeshadow palettes, I tend to drop some cash and get the good stuff.  Why?  Because a great palette is worth it.  A great palette is versatile enough for a variety of day and night looks, it’s perfect for travel and having multiple shadow colors in one product/case saves you from wasting time digging through your makeup stash looking for individual shadows.

So without further ado, here are my top 5 eyeshadow palettes:

n1

Naked Palette – Urban Decay

The first palette I ever purchased and the OG of the Naked line, the original Naked palette is basically perfect.  You have your standard matte blending and lid colors, shimmery highlight shades, and a plethora of darker shades.  There is no limit to the amount of work-appropriate AND night combinations you can create with these colors.  If you’re looking for a place to start with eyeshadow and don’t have this palette in your arsenal, what are you doing with your life?

Meet Matte Nude – The Balm

matte

This is my go-to palette for work days.  If the name didn’t tip you off already, all shadows in this palette are matte.  If you’re not in your 20s anymore or have hooded eyes (I fall into both of those categories), matte shadows are your best friend because they don’t accentuate lines or wrinkles.  The actual shadows in this palette are HUGE (I’ve had mine for over a year and have barely made a dent in them) and the color range flatters any eye color.  If you don’t want to spend your hard earned dough for the entire palette, at least get your hands on the peach shade, Matt Singh – it is the perfect crease blending color, in my self-proclaimed expert opinion.

singh

Naked 3 Palette – Urban Decay

n3


Yep, another Naked palette.  The Naked 3 is all about the rose gold color family with lots of mauves, gold, purple and pink tones.  The colors in this palette make blue and green eyes look absolutely amazing so if you’re a light-eyed person, You Need This.  I tend to use this one almost exclusively in the fall and winter months (it pairs very well with a dark, red wine-colored lip) and usually layer it over the Maybelline Color Tattoo in Pomegranate Punk to give some extra staying power.  As with all Naked palettes, the shadows blend extremely well and have fantastic color payoff.

Naked Basics 1 or Naked Basics 2 – Urban Decay

basics

Can you tell that Urban Decay palettes are my favorite?  The Naked Basics 1 and 2 are small, no nonsense and great for travel because they take up so little space.  If you don’t want to mess with any shimmery or bright colors and just want to put together a quick everyday look, these palettes do the job and do it well.  Basics 1 focuses on warm toned colors while 2 is all about cool tones.

basics2

Both palettes offer enough versatility to give you a neutral look for work or a smoky eye for night.  It’s all up to you.  I highly recommend picking up one of the Basics palettes if you don’t want to spend the $$ for a full Naked palette.

Vice 2 – Urban Decay

vice 2

Everyone needs at least one fun, weird palette.  I admittedly don’t use this palette nearly as often as the rest, but whenever I do, it’s always a good time.  This palette is great for experimentation and creativity with several dark colors for smokey eyes, bright 80s pinks and purples, edgy blue tones and warm bronze shimmery shades.  Nothing wrong with having an impractical, straight-up play around palette. It’s good for the soul.

Am I missing anything?  What are your favorite palettes?  Let me know!

Quick & Easy Makeup for Work

There are few things that can rival my love of makeup, but one thing that can is sleeping.  I’ve always been a world-champion sleeper and thoroughly enjoy sleeping in until the absolute last minute before it’s critical that I get up and start the day.

Like many people, I have to get up early in the morning to go to work.  How do I combine my true loves of sleeping and having enough time to put my makeup on?  Easy.  I keep my look simple, but impactful, and only focus on three things:

  1. Skin

A full face of foundation, contouring and powder? Ain’t nobody got time for that in the morning.  Instead, I use a flat top kabuki brush to apply Tarte Full Coverage Powder Foundation all over my face.  This foundation gives excellent coverage and helps control shine, no need for extra powder.  I’ll also quickly throw some Maybelline Fit Me concealer under my eyes to camouflage any darkness or puffiness, and I’m set.

  1. Eyes

If you can spare 1 minute, apply some light brown eyeshadow to your crease, but feel free to skip this if you want or are really pressed for time.  Instead, focus on your lashes and your brows.  Shaped and quickly filled-in brows make the face look “finished” (even if that face was just drooling onto a pillow 4 minutes ago).  A couple coats of mascara will help eyes look more open and awake.

  1. Lips

This is the key.  Wear a bright lipstick or balm.  My go-to color is red (in the photos below I’m wearing the Revlon Balm Stain in 045 Romantic) because I think it makes my teeth look crazy white, but a vivid pink also does the trick.  A bright lip pulls everything together, gives your face a pop of color and can distract from tired-looking eyes.

               red 1               red 2

(Confession: I have blush on, too)

This face takes 5 minutes max. It’s my go-to look on Monday mornings when I hit snooze once or thrice.  Plus, it’s appropriate for work, school….anything, really.  Hope you enjoy!

Skin Care 101: My Routine and Favorite Products

I have a confession.  Up until a couple years ago, I had no skin care routine whatsoever. Zero. Maybe I’d splash some water on my face in the morning and use whatever soap in the shower to do a mediocre job of washing off my makeup in the evening, but that was it.

I’m sure it comes as no surprise that my skin was dull with an uneven tone, fine lines were starting to form and, due to my naturally oily skin (thanks, Mom!), I had my share of acne.  Thankfully, I’ve learned a lot since then and now I actually get compliments on my skin, which still throws me off from time to time.  Take my advice and don’t wait 28 years to start caring for your face!

me
This is my face. And maybe a filter.

There are three basic steps to skin care: Cleansing, Exfoliating and Moisturizing.  Doesn’t sound too bad, right? Here is my current skin care routine and favorite products:

  1. Makeup Removal 

 1

I’m an evening shower person so we’ll start the routine with makeup removal. Removing all of your makeup before cleansing is a crucial step on the road to great skin. Before getting in the shower, I take off my makeup with a Neutrogena makeup remover wipe. The CVS brand of these wipes is great, too (and cheaper).  If I have some heavy-duty eye makeup on, I’ll soak a cotton ball with Neutrogena eye makeup remover and gently rub everything off.

  1. Cleansing and Exfoliating 

  2

I keep a rotation of several cleansers in the shower but usually mix together my all-time favorites of Cetaphil and the Garnier Blackhead Eliminating Scrub for Oily Skin.  Cetaphil is super mild and helps remove any remaining bits of makeup the wipe might have missed while the Garnier scrub removes dead skin and is gentle enough to use every day.  Plus, the charcoal in the scrub helps control acne and oily skin because, science.

3

Once or twice a week I’ll mix together a pump of Cetaphil with a small amount of my secret weapon: Skin Obsession Microdermabrasion Crystals.  These crystals are incredibly finely milled and a minute or two of rubbing this mixture all over your face will leave your skin baby soft and radiant.   Exfoliating is KEY in keeping skin soft, generating new skin cells and evening out skin tone. A smooth, even canvas gives you a fantastic base for applying makeup.  Exfoliating is also a necessity for keeping “mature” a.k.a over 30 skin, like mine, all glowy and youthful.

  1. Toning & Anti-Aging

4

Toner seems to be one of those things that people are on the fence about when it comes to skin care.  Do I think it’s a huge factor? No. Do I think it helps in my fight against oily skin? Yep. Once my skin is all cleansed, exfoliated and I’m out of the shower, I’ll soak a cotton ball in toner and wipe it all over my face.  Done.

Next it’s time for anti-aging. I’ve been using the Avene Retrinal 0.1 Cream ever since my dermatologist recommended it two years ago when I asked her what would help slow time from marching across my face.  The price is a little steep but you only need to use a pea-sized amount each night, so a tube will last months.  I apply this all over my face and neck. It has never made me break out, it doesn’t give that lovely sting that other retinol products can have and I think it’s done wonders for evening out my skin tone and plumping everything up a bit.  I highly recommend it.

While letting the Retrinal sink in and do its thing, I’ll apply a dot of Epiduo to any pimple that might be starting to show up and this stops it in its tracks.  I’m fairly certain that Epiduo is prescription only so ask your dermatologist for a sample.  It’s strong, effective stuff and can be very drying, so use a tiny dot only on the spot itself or you’ll risk the skin around it becoming dry and flaky.

  1. Moisturizing 

5

Anti-aging and acne prevention products can dry out the skin, so it’s time to put that moisture back in.  I like to use a combination of the classic Olay Night Cream with a few drops of Tarte Maracuja Oil mixed in. Yes, I have oily skin and yes, I put an oil on my face and I genuinely believe it’s one of the most important steps in my routine.  Maracuja oil has many benefits and is loaded with Vitamin C to give you a brighter, firmer complexion.  This oil is not cheap but when you only use 2-3 drops a day, it’s going to last.  I can’t say enough good things about it (although it smells a bit like french fry grease, but…who doesn’t love fries?).  For daytime moisture, I use the Olay Complete Moisturizer with SPF 15 after cleansing and before applying makeup.

Last, but certainly not least, I pat Olay Eye Lifting Serum underneath and around my eyes.

And that’s it!  This might sound like a ton of products and a lot of steps, but once I got into the habit, I got it down to a science and it only takes me 5-7 minutes, tops.

  1. Optional Step: Face Masks 

6

I don’t lead a particularly taxing life, but I still live by the “Treat Yo Self” motto.  Part of that treating is face masks.  I loooove them.  And you should, too, because they’re inexpensive, helpful for a range of skin issues and you’ll feel like a queen (or king, no judgement) waiting to be fed grapes while you lay around with your mask on.

Once or twice a week I’ll use one of the following masks, depending on what my skin’s doing or needing.  Bonus: All Freeman masks are inexpensive and sold at every drugstore:

  • Freeman Oatmeal & Avocado Clay Mask gets all the gunk out of your pores, leaving your skin extra clean and smooth. I like to use this mask at the end of the weekend since I’ve typically been wearing a lot of makeup and acting a fool for the past few days, so I need that deep clean.
  • Freeman Peel-Off Cucumber Mask is an old school, peel-off cucumber mask. Truthfully I just love this one for the Patrick Bateman-esque style of peeling the mask off once it’s all dry, but it does have actual skin smoothing and impurity-removing benefits.
  • Freeman Charcoal & Black Sugar Polishing Mask is a must for my fellow oily skin people because it contains our friend charcoal. This isn’t a mask exactly, but more a yummy-smelling paste.  Spread it all over your face, let it sit for a couple minutes, rub it all around your face for a minute or two, wash it off and voila! Glowing, smooth skin is yours.

My number one skin care tip? Be consistent. A solid routine and great products won’t help much if you’re only using them sporadically.  Carve out a couple minutes in your day to take care of your skin and I promise, your face will thank you for it.

5 Sweat-Proof Summer Makeup Tips

Now that we’ve almost reached August, it’s fitting that the weather is face-meltingly hot and humid.  There are few things more frustrating than putting your face on and having it all run off like a (very colorful) waterfall within two minutes of stepping out the door.

Luckily for you, I have some sweat-proof summer makeup tips:

  1. Makeup setting spray

I’m one of those people who is #blessed to have incredibly oily skin year round, and the day I discovered the Urban Decay All Nighter Setting Spray , my life changed for the better.  This spray is a bit pricey but it lasts a long time and really helps lock your makeup in place.  A couple sprays before you start applying your makeup, a couple sprays when your makeup is finished and boom. Done. Your makeup is staying put.

  1. BB Cream

When it’s hot as hell, the last thing you want to do is slather a layer of liquid foundation on your mug.  Enter the BB cream.  A good BB cream is lightweight, gives you decent coverage and usually contains the all-important SPF needed in the summer.  My favorite is the Rimmel Matte BB Cream.  Anything with “matte” in the title will help keep shine at bay.

  1. Bronzer

You probably have a bit of a tan already, so why not go all out and use bronzer on All The Things?  I’m not a fan of heavy eye makeup when I know I’m going to be out in the heat, so I’ll sweep some bronzer through the crease of my eye to give a little color and shimmer without much product, then throw some on my cheeks and along my hairline.  A great (and cheap!) drugstore bronzer is the Physician’s Formula Bronze Booster.

  1. Balm stain

Lips can be tricky in the summer.  Gloss is so sticky, lipstick can melt (or smear all over your face while you’re inhaling a hot dog) and a stain is far too drying.  Thankfully the good people at Revlon created the Balm Stain.  This may be my all-time favorite drugstore product.  You get the color payoff and longevity of a stain with the moisture of a balm, plus this line comes in a huge range of colors.  Can’t ask for much more than that.

  1. Waterproof mascara

This one is pretty self-explanatory.  Sweating and regular mascara don’t mix well. Or maybe you’re like me and want your lashes to look fabulous even when you’re swimming.  Either way, you need a waterproof mascara in the summer.  My current favorite is the CoverGirl Super Sizer.  The skinny brush is great for really lengthening and separating each lash (and it’s great for the lower lashes, too).

There you have it!  I hope these tips help, and if all else fails, just camp out in the air conditioning until October.

6 Easy Steps to Applying False Lashes

Ah, false lashes.  Aside from winged eyeliner, false lashes may be the most-feared tool/technique in the beauty arsenal.  But fear not!  I’m here to help. Falsies can have a significant effect on your overall look and are a great way to add a little oomph for a big event or night out.

Here is my six step guide to applying false lashes with relative ease:

Step 1: Have a drink

No, seriously.  Have a drink (or if you’re not a booze person, do a little yoga or deep breathing or whatever you people do to loosen up).  I firmly believe that false lashes can smell fear and the more relaxed you are, the better.  Don’t get hammered, but put on some good “I’m going out tonight!!!11” tunes, have a drink and approach the process as fun instead of An Ordeal.  It helps, I promise.

Step 2: Select your false lashes and cut them to size

Eyes come in all different shapes and sizes so you may need to trim your falsies down to fit your peepers.  Simply hold the lash strip up to your eye and decide if you need to trim a few hairs off the end or if you’re good to go.  Having a lash that’s too long and tickling the inside of your eye/nose area is the opposite of fun, so don’t skip this step.

Step 3: Prep your natural lashes

Now we’re getting somewhere.  Take a look at your natural lashes.  Are they fairly straight?  Then curl them with a lash curler and swipe on 1 (one) coat of mascara.  If your lashes are particularly straight, I suggest waterproof mascara to really make sure your lashes stay curled.  If your lashes naturally curl up like mine do (humblebrag), feel free to run a clean mascara wand or spoolie through your lashes to get them all fanned out, separated and ready to go.

Step 4: Glue time

Use a good quality glue!  You want these suckers to stay on and a good glue does just that.  My personal favorite is Duo Lash Adhesive, Clear, 0.25 Ounce, easily found online or at any drugstore.  There are really two options when it comes to glue application: apply to the seam of the false lash strip, or apply the glue directly to your own lash line.  I’m a fan of both ways but tend to use the “apply to the false lash strip” method.  Apply a VERY thin line of glue to the lash strip seam.  The cardinal rule here is to let the glue dry for a good 30 seconds before you attempt to place the lashes on your eye.  The glue must be tacky to get a good, solid hold.  These will probably be the longest 30 seconds of your life, so feel free to use this time to take a swig of the drink mentioned in Step 1.

Step 5: Lash application

This is it.  Here we go.  Pick up your lash strip with either tweezers or those handy little lash-gripper tong things that come with many lash kits.  Look down into a mirror and carefully place the lashes on your eyelid as close to your natural lash line as possible.  Breathe.  Try to secure the middle of the lash strip over the pupil of your eye first.  Once that part is secured, carefully tug the end of the false lashes out to fit the inner and outer corners of your eye.  Breathe again.  Once you feel that the lash strip is well secured, take the flat side of a bobby pin and run it over the lash strip to smooth it down and really get a good hold.  Let the glue dry for a couple minutes.

Step 6: Merge the real with the fake

You’re almost done!  Once the glue has dried, use your favorite mascara to bond your real lashes with the falsies.  A couple swipes on each eye should do it.  Don’t forget to add mascara to your lower lash line to balance things out.  Finally, use eyeliner to draw on the seam of the lash and lash line to help blend everything together.

And you’re done!  You may want to throw the glue and tweezers in to your purse just in case, but if you follow these steps, your false lashes should have no problem staying on for many hours. Enjoy!